
Many women in menopause and perimenopause expressed interest in transitioning from dairy to alternative milks, such as rice milk, oat milk, almond milk, soy milk, and others. In part one of this article, you can read about the advantages and disadvantages of consuming dairy and alternative milks during menopause and perimenopause.
Once you’ve decided to opt for alternative milks, the next question arises: should you buy them from the store or make them yourself? If you’ve chosen to make these alternative milks at home, I have some trusted recipes to share with you.
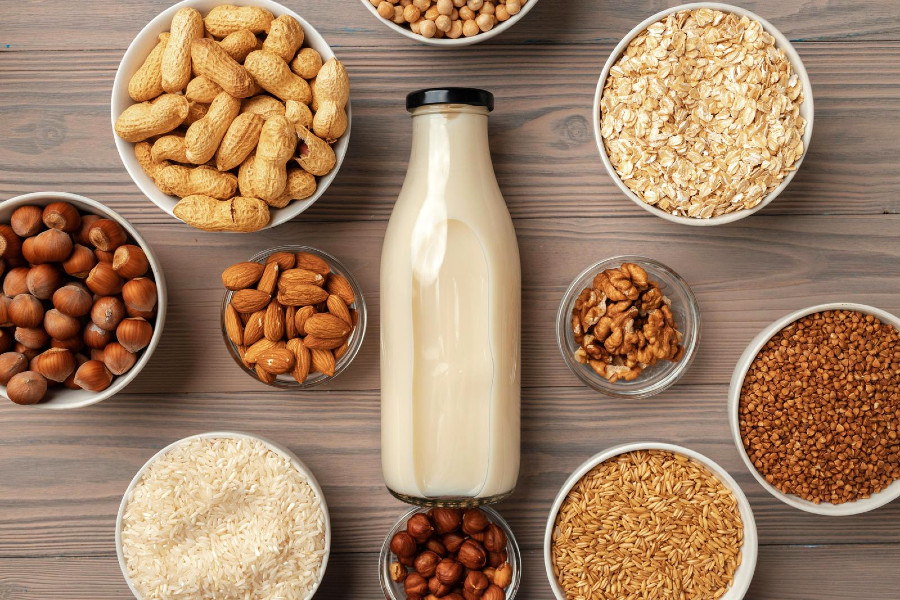
Homemade alternative milks offer a wide range of options that provide essential nutrients and can help alleviate common menopause symptoms. In this article, we will explore some simple and wholesome recipes specifically tailored to support women during menopause and perimenopause. From creamy almond milk to nourishing oat milk, let’s explore these easy-to-make recipes for your menopausal journey.
Almond (or any other nut) milk recipe master recipe
Ingredients:
1 cup raw almonds
3-4 cups water (plus more for soaking)
Optional: Sweeteners like honey, maple syrup, or dates for added flavor
Instructions
- Soak the almonds overnight: Place the almonds in a bowl and cover them with water. Allow them to soak overnight or for at least 6-8 hours. Soaking helps soften the almonds and aids in the blending process.
- Drain and rinse: Drain the soaked almonds and rinse them thoroughly with fresh water.
- Blend the almonds: Place the soaked and rinsed almonds in a blender along with 3 cups of fresh water. Blend on high speed for about 2-3 minutes or until you achieve a creamy, smooth consistency. Taste and decide if you want to add more water.
- Strain the mixture: Place a nut milk bag, cheesecloth, or fine mesh sieve over a large bowl or jug. Pour the almond mixture into the bag or sieve, and gently squeeze or press to extract the milk. This will separate the almond pulp from the milk. You can use the pulp in recipes or discard it.
- Optional: Sweeten to taste: If desired, you can add a sweetener such as honey, maple syrup, or dates to enhance the flavor. Start with a small amount and adjust to your preference. Add them during the blending process.
- Store and refrigerate: Transfer the homemade almond milk to a clean container with a lid. Store it in the refrigerator and use within 3-4 days. Be sure to shake or stir the milk before each use, as separation is natural.
Note: You can adjust the water-to-almond (nuts) ratio to achieve your preferred consistency. Using less water will result in a creamier milk, while using more water will make it lighter (and less calories). Additionally, you can experiment with flavors by adding a pinch of vanilla extract or a dash of cinnamon for extra taste.
If you want a thicker milk with fewer almonds, you can add oats. Soak the oats overnight and add them during the blending step. Start with ½ cup of oats for 4 cups of water (in addition to almonds). There is no right or wrong ratio here; it can be adjusted to personal preference.
My preferred sweetener is dates, but the milk also tastes good on its own. Enjoy your homemade almond milk in smoothies, cereals, coffee, or any recipe that calls for milk!
Note: If you don’t have a powerful blender you may need to soak the nuts for longer or use softer nuts such as cashews, see recipe below.

Oat milk recipe
Ingredients:
1 cup rolled oats
3 cups water
Optional: Sweeteners like honey, maple syrup, or dates for added flavor
Follow the previous recipe, replacing almonds with rolled oats.
Cashew nut milk recipe
If you don’t have a powerful blender, cashews make a great milk in most blenders. They also require less soaking time.
Ingredients:
1 cup raw cashews
3-4 cups water (plus more for soaking)
Optional: Sweeteners like honey, maple syrup, or dates for added flavor
Follow the previous instructions, replacing almonds with cashews.

How to make creams
Follow the same recipes, but start with a 1:1 ratio of water to nuts, and add more water as you reach your desired consistency. These creams are delicious but very rich in calories.
Nice cream master recipe
Nice cream is a popular alternative to the real ice cream
Ingredients:
2-3 ripe bananas, peeled and sliced (frozen)
1-2 tablespoons of your choice of milk (such as almond milk, soy or coconut milk)
Optional: Flavorings such as vanilla extract, cocoa powder, frozen berries, nuts, or chocolate chips, natural sweeter.  You can make it sweeter if you like, but keep in mind that ripe bananas are naturally very sweet. If you desire additional sweetness, you can add ingredients such as dates, maple syrup, or other sweeteners of your choice
Instructions:
- Start by freezing the sliced and peeled bananas. It’s best to freeze them in a single layer on a parchment-lined baking sheet for a few hours or overnight until they are solid.
- Once the bananas are frozen, transfer them to a blender or food processor. Add 1-2 tablespoons of milk to help with the blending process.
- Blend the frozen bananas until they start to break down and form a creamy consistency. You may need to scrape down the sides of the blender or processor a few times to ensure everything is well blended.
- At this point, you can add any desired flavorings to customize your nice cream. For example, you can add a splash of vanilla extract for a classic flavor, or mix in cocoa powder for a chocolatey twist. You can also add frozen berries, nuts, or chocolate chips for added texture and taste.
- Blend the mixture again until everything is well combined and you achieve a smooth and creamy texture.
- Once the nice cream reaches your desired consistency, you can serve it immediately as a soft-serve treat. If you prefer a firmer texture, transfer it to a container and place it in the freezer for an additional 1-2 hours to firm up.
When ready to serve, scoop the nice cream into bowls or cones, and enjoy!
You can also make ice cream with the normal recipes substituting dairy for alternative milks, but the ice cream tends to be less creamy.
Feel free to experiment with different flavors and toppings to create your own variations of nice cream. It’s a versatile recipe that can be customized to suit your preferences. Enjoy your homemade nice cream!
As you see there are a lot of recipes to substitute dairy. When it comes to cheeses the flavor is very different than the real thing, but they taste good, there are many options in the market (some are very expensive).
I hope you love these recipes as much as I do. I invite you to take a look at my course, BLISS in Menopause, and download your free symptoms tracker. You can also join my Facebook group to stay in the loop and share with a group of positive, encouraging women